Step-by-Step Instructions: Connecting Your Tesla to a Secure Wi-Fi Network
Connecting your Tesla to a secure Wi-Fi network is essential for updating software, accessing online features, and maximizing the functionality of your electric vehicle. By following these step-by-step instructions, you can effortlessly connect your Tesla to a secure Wi-Fi network and enjoy the benefits of seamless connectivity.
Identify a Secure Wi-Fi Network
When connecting your Tesla to a Wi-Fi network, it's crucial to select a secure network that requires a password for access. Ensure that the network you choose is reliable, preferably your home or workplace network, which provides consistent and uninterrupted internet connectivity.
Enable Wi-Fi on Your Tesla
To begin the connection process, turn on your Tesla's display by stepping into the car or pressing the brake pedal. Navigate to the main menu and select 'Controls.' From the sub-menu, choose 'Settings' and locate the 'Wi-Fi' option. Toggle the switch to enable Wi-Fi on your Tesla.
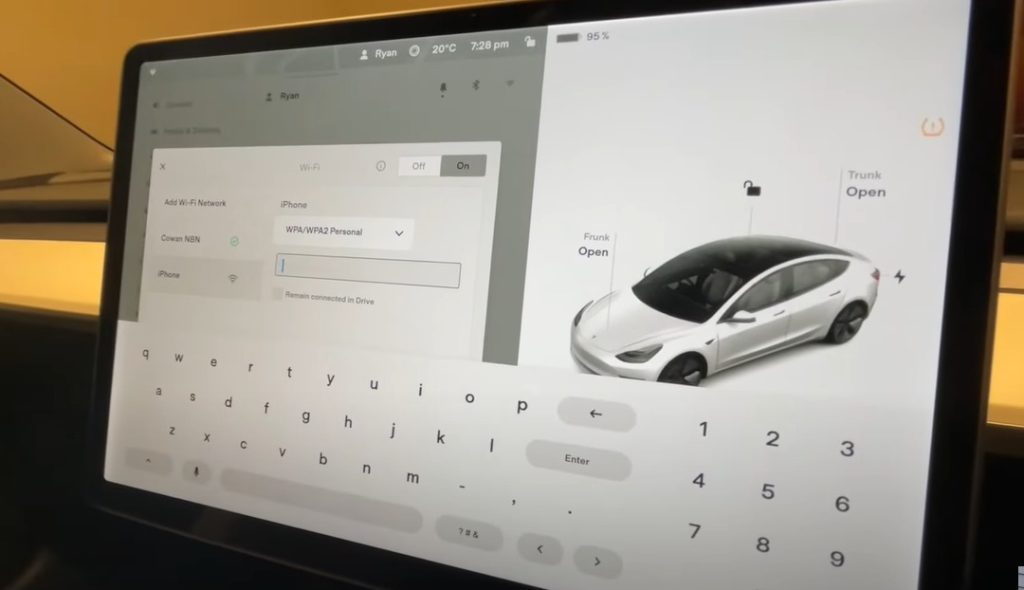
Scan for Available Networks
After enabling Wi-Fi, your Tesla will scan for available networks. Wait until the scanning process completes, and a list of networks appears on the screen. Select the network you want to connect to from the list. If your desired network doesn't appear, ensure that the network is within range and broadcasting its SSID (network name).
Enter the Wi-Fi Password
If the selected Wi-Fi network is secured, you will need to enter the network password to establish a connection. Input the password using the on-screen keyboard. Make sure to enter the password accurately, paying attention to uppercase and lowercase letters as passwords are case-sensitive.
Establish the Connection
Once you have entered the correct password, your Tesla will attempt to connect to the Wi-Fi network. This process may take a few moments. If the connection is successful, a confirmation message will be displayed, indicating that your Tesla is now connected to the Wi-Fi network.
Test the Connection
To verify that your Tesla is successfully connected to the Wi-Fi network, access the 'Software' menu from the main settings. Select 'Check for Updates' to ensure that your car's software is up to date. If an update is available, follow the on-screen prompts to install it. This step confirms that your Tesla can communicate with the Tesla servers through the Wi-Fi connection.
Adjust Wi-Fi Settings (Optional)
If desired, you can customize your Tesla's Wi-Fi settings further. Return to the main 'Wi-Fi' settings menu and explore the available options. You can set your Tesla to automatically connect to known networks, forget saved networks, or adjust other advanced settings based on your preferences.
Maintain Network Security
Once your Tesla is connected to a secure Wi-Fi network, it's essential to maintain network security. Ensure that the Wi-Fi network you are using employs WPA2 encryption, regularly update the network password if necessary, and follow best practices for securing your home or workplace network. By maintaining a secure Wi-Fi network, you protect both your Tesla and personal data from potential threats.

Connecting your Tesla to a Wi-Fi network allows you to receive software updates wirelessly, access online features such as music streaming and internet browsing, and ensure a seamless and connected ownership experience.
To enable Wi-Fi on your Tesla, turn on the car's display by stepping into the vehicle or pressing the brake pedal. Navigate to the main menu, select 'Controls,' then choose 'Settings.' Locate the 'Wi-Fi' option and toggle the switch to enable it.
It is recommended to connect your Tesla to a secure Wi-Fi network that requires a password for access. Choose a reliable network, preferably your home or workplace network, which provides consistent and uninterrupted internet connectivity.
Once Wi-Fi is enabled on your Tesla, it will automatically scan for available networks. To access the list of networks, wait until the scanning process completes, and a list of networks appears on the screen. Select the network you want to connect to from this list.
If your desired Wi-Fi network does not appear in the network list, ensure that the network is within range and is broadcasting its SSID (network name). If the network is still not visible, check that the network is compatible with Tesla's Wi-Fi connectivity requirements.
If the selected Wi-Fi network is secured, you will need to enter the network password to establish a connection. Using the on-screen keyboard, input the password accurately, paying attention to uppercase and lowercase letters as passwords are case-sensitive.
Once you have entered the correct Wi-Fi password, your Tesla will attempt to connect to the network. This process may take a few moments. If the connection is successful, a confirmation message will be displayed, indicating that your Tesla is now connected to the Wi-Fi network.
To verify that your Tesla is successfully connected to the Wi-Fi network, access the 'Software' menu from the main settings. Select 'Check for Updates' to ensure that your car's software is up to date. If an update is available, follow the on-screen prompts to install it. This step confirms that your Tesla can communicate with the Tesla servers through the Wi-Fi connection.
Yes, you can customize your Tesla's Wi-Fi settings. Return to the main 'Wi-Fi' settings menu and explore the available options. You can set your Tesla to automatically connect to known networks, forget saved networks, or adjust other advanced settings based on your preferences.
To maintain network security, ensure that the Wi-Fi network you are using employs WPA2 encryption. Regularly update the network password if necessary, and follow best practices for securing your home or workplace network. By maintaining a secure Wi-Fi network, you protect both your Tesla and personal data from potential threats.
Conclusion
Connecting your Tesla to a secure Wi-Fi network enhances your ownership experience by enabling software updates, accessing online features, and ensuring seamless connectivity. By following these step-by-step instructions, you can connect your Tesla to a secure Wi-Fi network effortlessly. Remember to choose a secure network, enable Wi-Fi on your Tesla, scan for available networks, enter the Wi-Fi password accurately, establish the connection, test the connection through software updates, customize Wi-Fi settings as desired, and maintain network security. With a stable Wi-Fi connection, you can fully leverage the capabilities of your Tesla electric vehicle.